Appearance
Loading Data into Your Schema
Learn how to load data into your DDK schema objects. There are multiple methods depending on your use case and data source.
What You'll Learn
- Load seed data manually using workflows
- Bulk load data from JSON/CSV files
- Ingest data from external APIs (GET/POST requests)
- Transform and validate data before loading
Overview
There are three practical ways to load data into your DDK schema:
| Method | Best For | Complexity |
|---|---|---|
| Method 1: Manual Workflow Load | Learning how data connections work, loading data from workflow outputs, transformation logic | Medium |
| Method 2: Bulk File Load | Loading multiple records from JSON/CSV files, seed data, out-of-the-box data | Low |
| Method 3: API Data Ingestion | Fetching data from external APIs, real-time data integration | Medium |
Prerequisites
Before loading data, ensure:
- Your schema is created - Complete Creating a Data Schema
- Migrations are applied - Your database tables must exist
- DDK is deployed - Your project must be built and deployed
Verify Migrations Are Applied
If migrations are not applied, data loading will fail with errors like "table/object does not exist" or "Gorm errors".
To check and apply migrations:
- Open your DDK in Nexus
- Go to Migrate
- Click Create migration if you have new schema changes
- Click Apply latest migration
Use Hospital ED Example
For these examples of data loading we will be using a hospital emergency department example. This can be adjusted to suit your use case. The DDK should be set up as follows:
EDSettings Fields Summary
| Field Name | Data Type | Required | Constraints | Default Value |
|---|---|---|---|---|
id | ID | Yes | Primary Key | - |
bedCount | Int | Yes | - | - |
staffOnShift | Int | Yes | - | - |
triageThreshold | Int | Yes | - | - |
simulationDate | String | Yes | - | - |
EDOutcome | Existing Object (EDOutcome, One-to-one, edSettingsId, id) | Yes | - | - |
EDOutcome Fields Summary
| Field Name | Data Type | Required | Constraints | Default Value |
|---|---|---|---|---|
id | ID | Yes | Primary Key | - |
dtTimestamp | Int | Yes | - | - |
predictedWaitMinutes | Float | Yes | - | - |
bottleneckScore | Float | Yes | - | - |
result | String | Yes | - | - |
edSettingsId | ID | Yes | Unique | - |
Method 1: Manual Workflow Load
Best for: Learning data connections, loading data from workflow outputs, applying transformation logic before saving.
This method teaches you how data flows from workflow tasks to GraphQL mutations. You'll use this pattern when:
- A simulation finishes and writes outcomes to the database
- An AI workflow produces structured output
- A user action triggers a workflow that creates records
- You need transformation between a task and a GraphQL mutation
Example: Loading EdSettings Object
We'll create a workflow that loads a single record into an EdSettings object.
Step 1: Create a Workflow
In the MDK:
- Navigate to Workflows
- Click Blank Workflow
- Remove any placeholder tasks if needed
Step 2: Add an Object Constant
The Object Constant will hold your seed data.
- In the workflow, open the Components panel
- Search object then navigate to: Data Management → Constants → Object Constant
- Drag the Object Constant component into your workflow
Step 3: Define Your Data
In the Object Constant configuration, replace the default structure with your data.
Example for EdSettings:
json
{
  "id": "1",
  "bedCount": 50,
  "staffOnShift": 12,
  "triageThreshold": 5,
  "simulationDate": "16/06/2026"
}
Match Your Schema
- Field names must exactly match your GraphQL object fields (case-sensitive)
- Data types must match (strings in quotes, numbers without quotes)
- Required fields must be included
To check your schema fields, go to your DDK → select your object → view the Schema tab.
Expected fields for this example:
id→ StringbedCount→ IntstaffOnShift→ InttriageThreshold→ FloatsimulationDate→ String
Step 4: Create a Data Connection
Now connect your object constant to your GraphQL schema.
- Click Data Connection in the workflow
- Choose Data Schema
- Configure the connection:
- Name: "Export ED Settings"
- Preceding task: Select your Object Constant task
- Input key:
obj - Map input: Response from Object Constant task
- Target schema object:
edSettings - Mutation:
createEdSettings
Step 5: Add the Python Transform
The data connection generates a Python operator to convert your object into the mutation input.
In the operator code, scroll to the bottom and replace the default body with:
python
return CreateEdSettings(
    **obj.value
)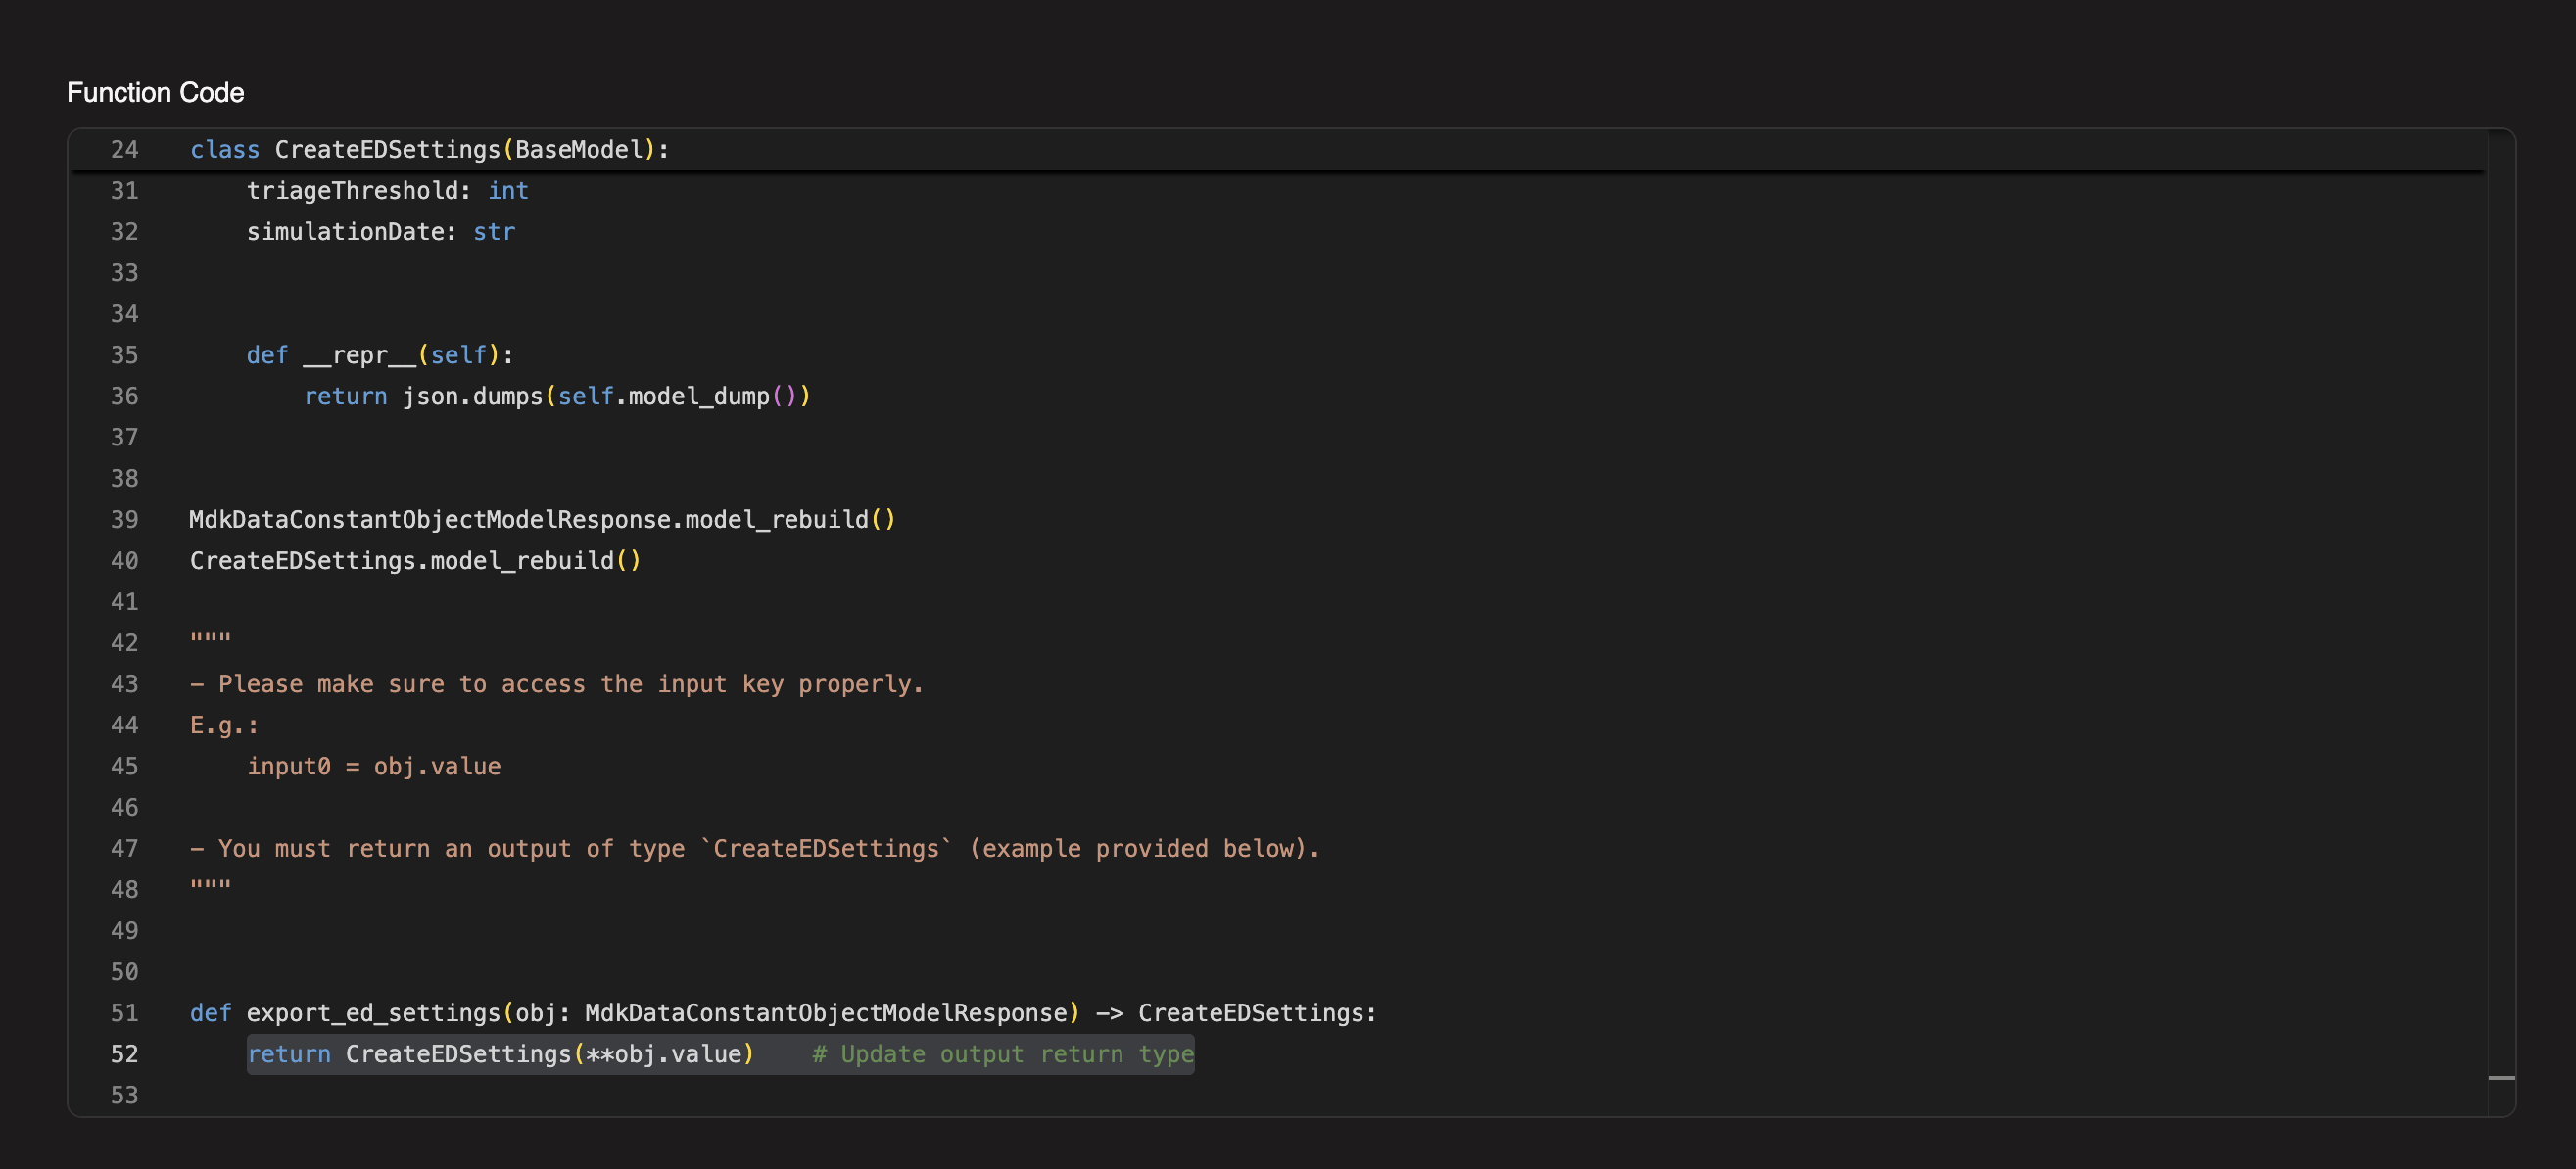
This unpacks the dictionary from the object constant into the mutation input fields.
What does **obj.value do?
The ** operator unpacks a dictionary into keyword arguments.
If obj.value is {"id": "1", "bedCount": 50}, then:
python
CreateEdSettings(**obj.value)becomes:
python
CreateEdSettings(id="1", bedCount=50)Step 6: Test the Workflow
- Click Update to save your workflow
- Click Test to run the workflow
If the workflow fails:
- Open the task logs for the failed task
- Check for validation errors:
- Missing required fields
- Wrong data types (e.g., string where number expected)
- Typos in field names
- Fix the object constant data
- Click Test again
Common errors:
missing required fields- Add the missing field to your object constantwrong value types- Check that numbers aren't in quotes, strings are in quotesmissing migration/table- Go back and apply migrations in the DDK
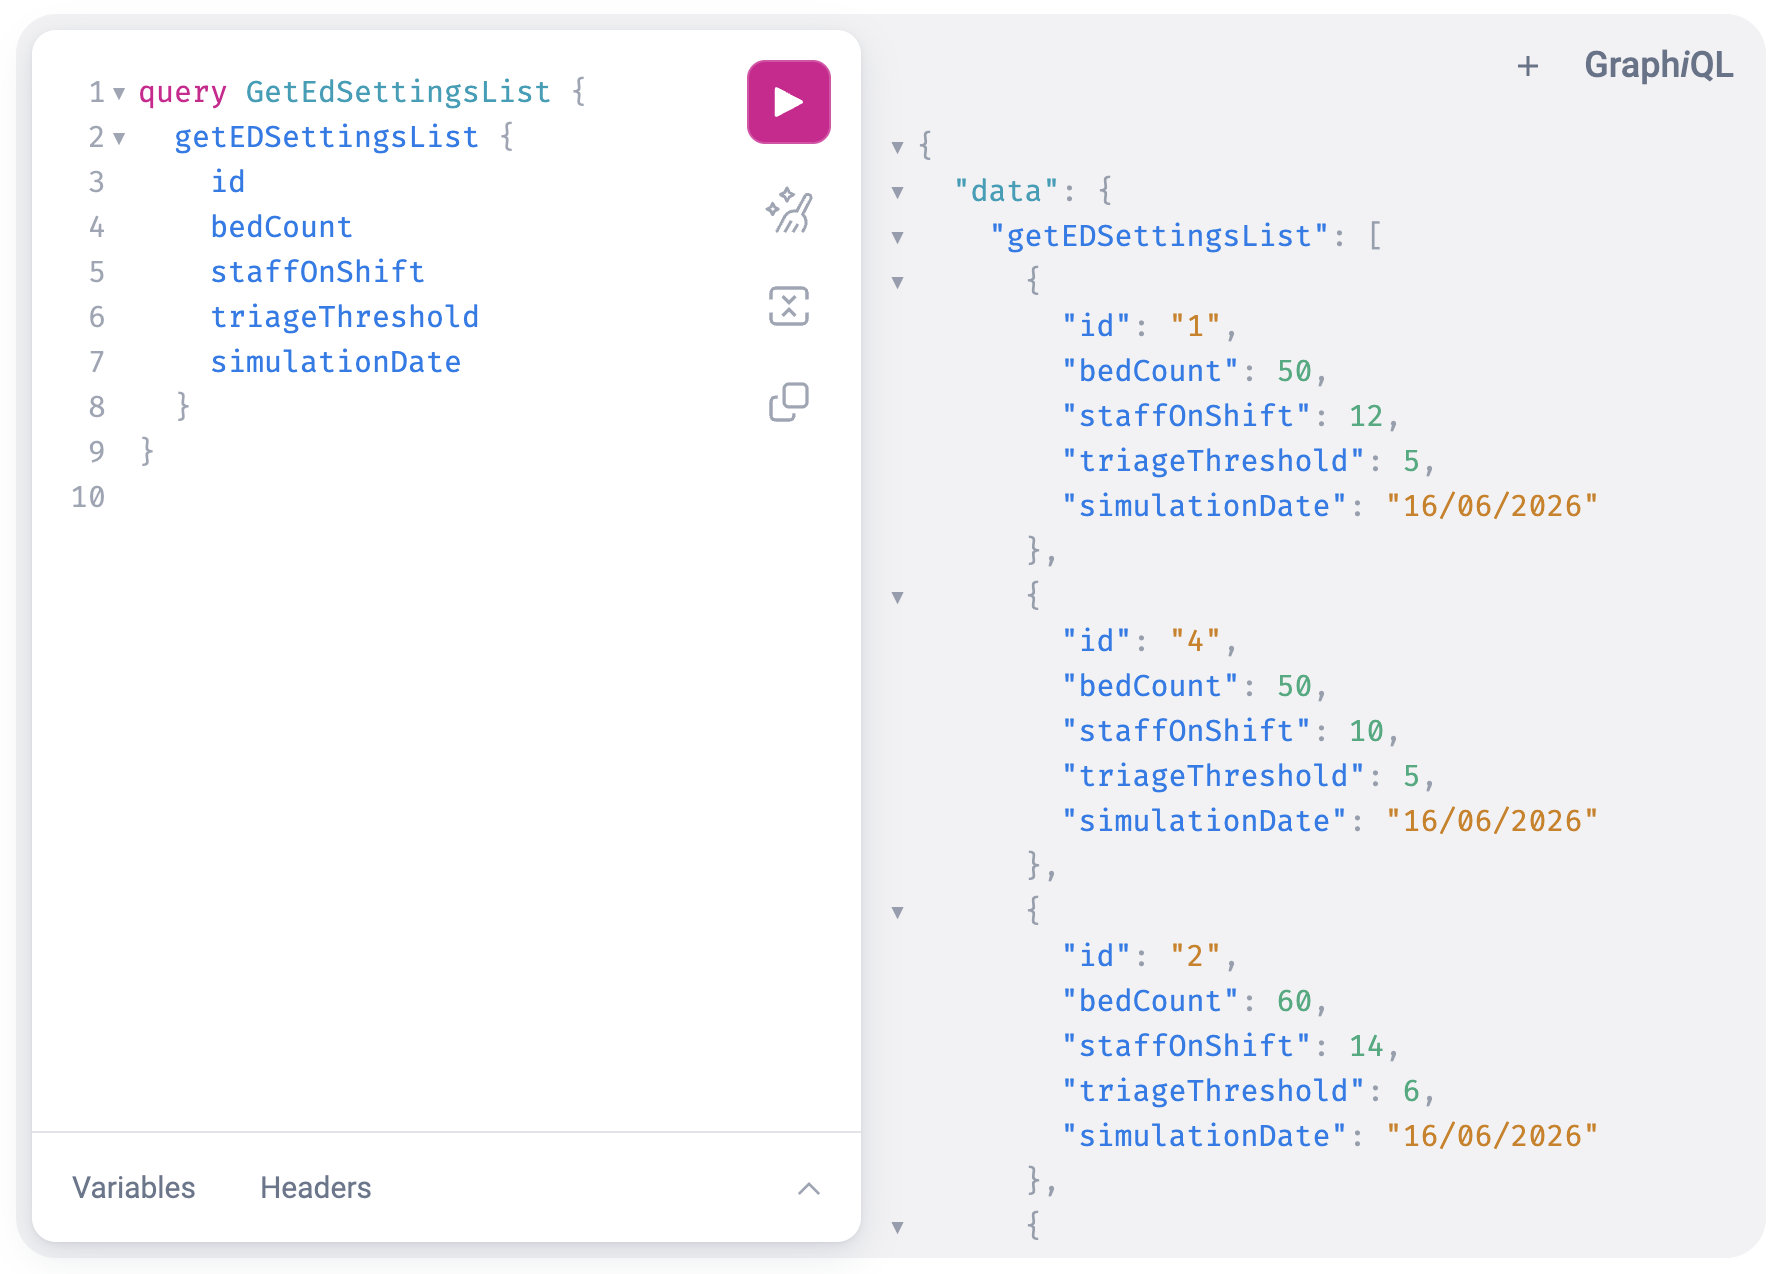
Step 7: Validate in GraphQL
Once the workflow succeeds, confirm the data was created.
- In the DDK, go to GraphiQL View
- Run a query to list your data:
graphql
query GetEdSettingsList {
  getEdSettingsList {
    id
    bedCount
    staffOnShift
    triageThreshold
    simulationDate
  }
}- You should see your inserted record in the results
Why This Method Matters
This manual workflow pattern is reusable beyond seed data. Once you understand it, you can apply it to:
- Save simulation results
- Process and store AI outputs
- Handle user-triggered data creation
- Transform data between workflow steps
Method 2: Bulk File Load
Best for: Loading multiple records at once from JSON or CSV files, creating seed data, out-of-the-box data setup.
This is the fastest method for loading many records. You prepare a file with your data and the DDK loads it directly into your database.
Supported File Formats
- JSON file - Array of objects
- Raw JSON - Paste JSON directly into a task
- CSV file - Table with headers
- Raw CSV - Paste CSV directly into a task
When to Use Each Format
- File-based loading (JSON file, CSV file) - For larger datasets, permanent seed data
- Raw loaders (raw JSON, raw CSV) - For small inline datasets, quick tests
Example: Bulk Loading EdSettings from JSON
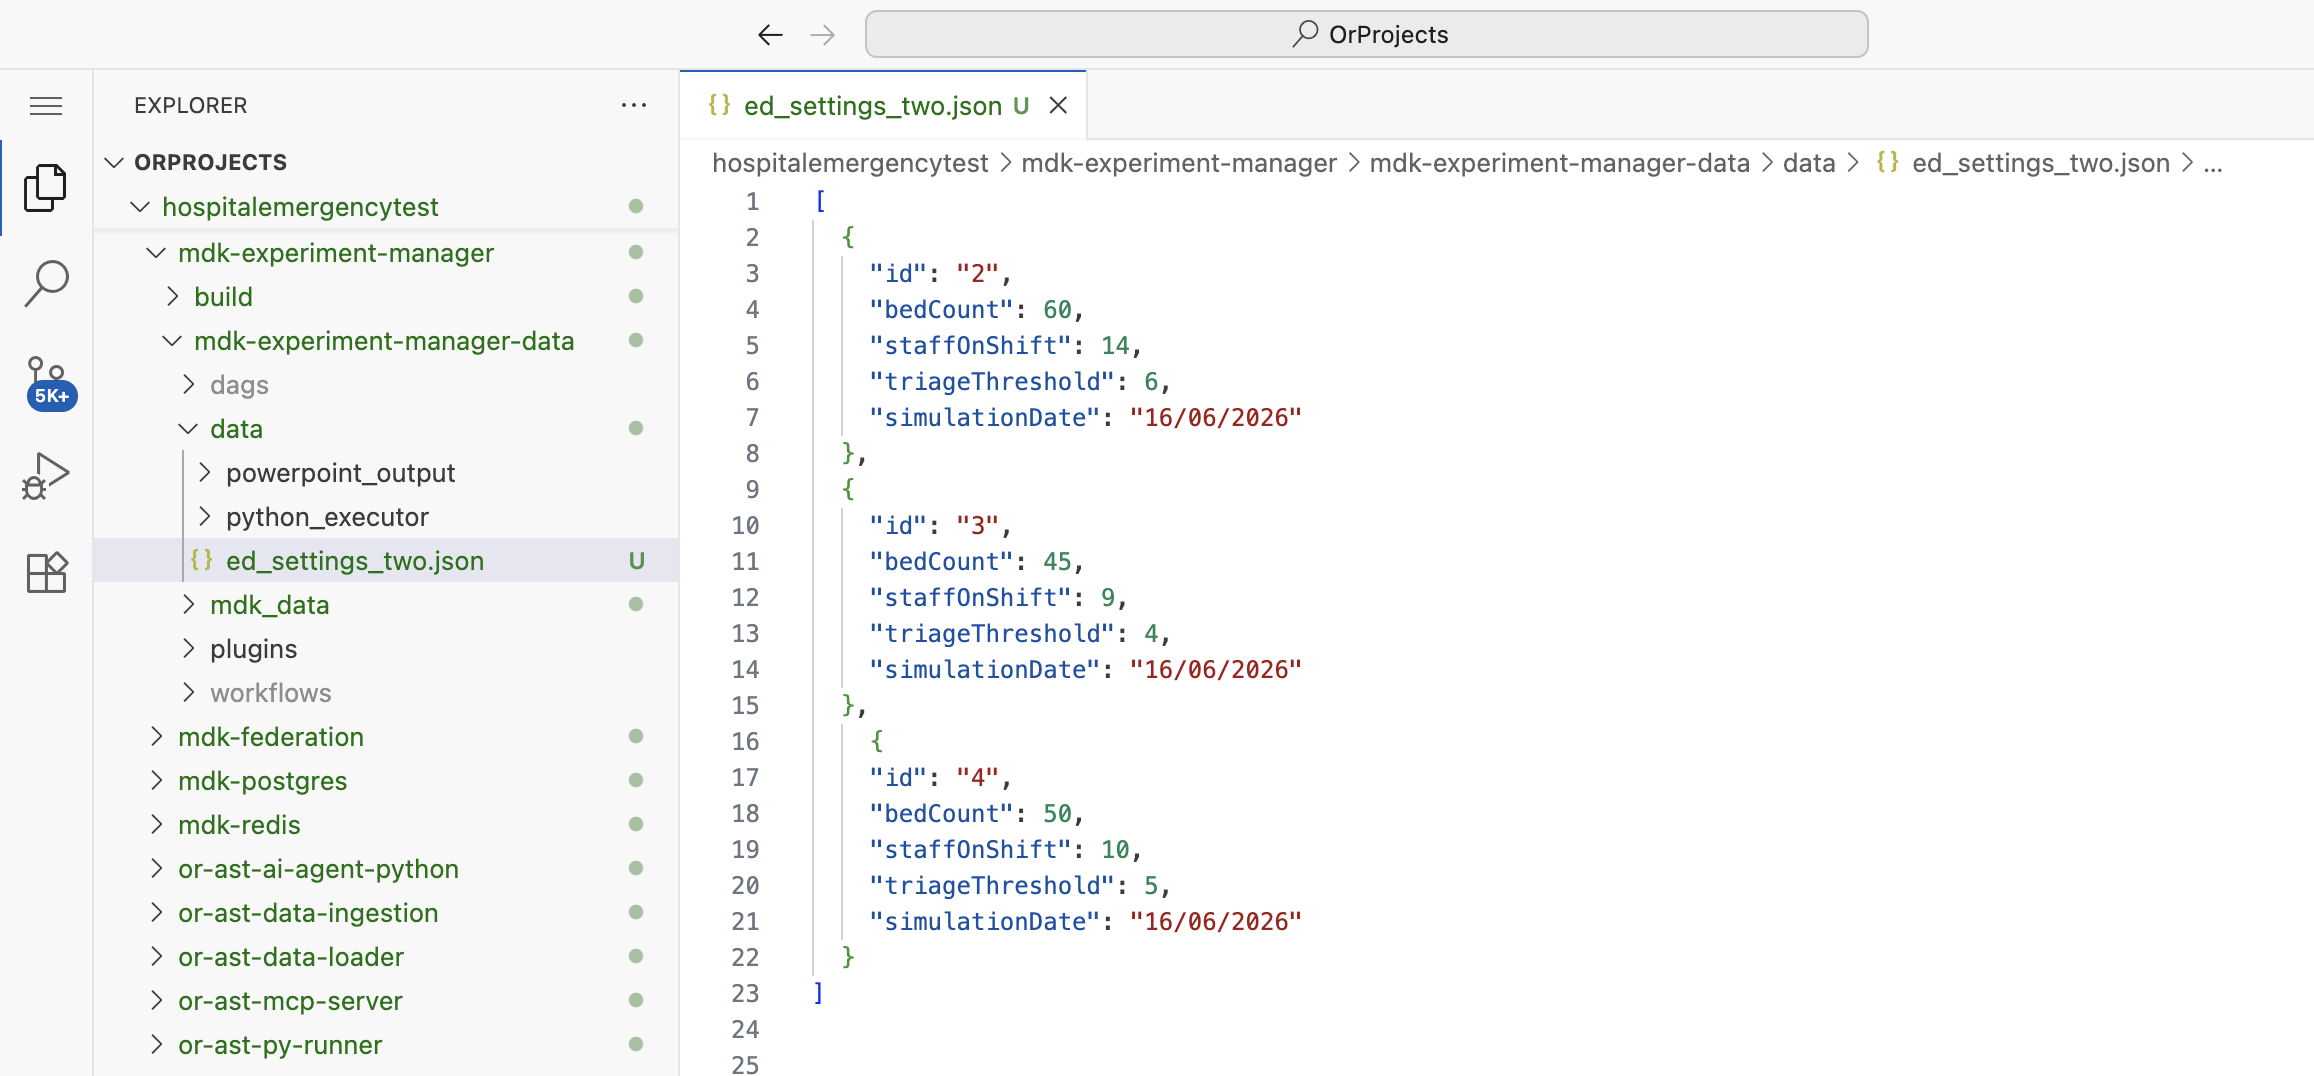
Step 1: Create the Data Folder
In your project repository:
- Navigate to: MDK Experiment Manager → MDK Experiment Manager Data
- Create a folder called
data - Inside the
datafolder, create a file:ed_settings.json
Step 2: Add JSON Seed Data
Put an array of records in your JSON file.
Example ed_settings.json:
json
[
  {
    "id": "2",
    "bedCount": 50,
    "staffOnShift": 10,
    "triageThreshold": 5,
    "simulationDate": "16/06/2026"
  },
  {
    "id": "3",
    "bedCount": 60,
    "staffOnShift": 14,
    "triageThreshold": 6,
    "simulationDate": "16/06/2026"
  },
  {
    "id": "4",
    "bedCount": 45,
    "staffOnShift": 9,
    "triageThreshold": 4,
    "simulationDate": "16/06/2026"
  }
]
JSON Format Requirements
- Must be an array
[ ... ]containing objects - IDs must be unique across all records (including exisitng records)
- Use native types: numbers without quotes, strings with quotes
- Field names must match your schema exactly
Step 3: Create a Bulk Load Workflow
In the MDK:
- Create a new workflow (e.g., "Data Load")
- Open the Components panel
- Navigate to: Data Management → Loading
- Drag Upload JSON File into your workflow
Step 4: Configure the JSON Load Task
Configure the task with two sections: file path and database settings.
File Path
Set the input file path to the mounted data path inside the runtime:
/airflow/data/ed_settings.jsonUnderstanding the Path
- Your local path:
MDK Experiment Manager Data/data/ed_settings.json - Runtime path:
/airflow/data/ed_settings.json
The MDK Experiment Manager Data folder is mounted as /airflow/data/ inside the workflow runtime.
Database Settings
Set alterSchema in Config to false. Configure the destination database to match your deployment (you can check these values in the nexus by looking at configure):
json
{
  "host": "postgres",
  "port": 5432,
  "user": "postgres",
  "table": "EDSettings",
  "schema": "public",
  "password": "postgres",
  "databaseName": "postgres"
}
Important Settings
alterSchema: false- Don't modify the database schema (recommended)schema- Must exactly match the schema name you configured (case-sensitive)table- Must match your object name (usually CamelCase)- Other settings (
host,port, etc.) - Use the values from your deployment in Nexus
Step 5: Run the Bulk Load Workflow
- Click Update to save the workflow
- Click Test to run the workflow
Expected output:
json
{
  "success": true,
  "targetTable": "EdSettings",
  "rowsInserted": 3
}
Step 6: Validate in GraphQL
Verify the records were loaded:
- Go to GraphiQL View in the DDK
- Run your list query:
graphql
query GetEdSettingsList {
  getEdSettingsList {
    id
    bedCount
    staffOnShift
    triageThreshold
    simulationDate
  }
}- You should see all 3 records (IDs: 2, 3, 4)
Alternative: Raw JSON Load
If you don't want to create a file, you can paste JSON directly into a task.
- In Components, search for JSON
- Go to Data Management then Loading then add Upload raw JSON data
- In the task Inputs, paste your JSON array
- Configure the database settings (same as Step 4 above)
- Run the workflow
When to Use Raw JSON
- Quick tests with a few records
- Data generated by a previous workflow step
- Don't want to manage separate files
For permanent seed data, use the file-based method.
CSV Data Loading
The same bulk-loading pattern works with CSV files.
CSV Format Requirements
- First row must be headers matching your field names
- Consistent data types in each column
Example ed_settings.csv:
csv
id,bedCount,staffOnShift,triageThreshold,simulationDate
2,50,10,5,16/06/2026
3,60,14,6,16/06/2026
4,45,9,4,16/06/2026
CSV Loading Options
In Components, search for CSV. You'll see three options:
- CSV file - Upload a CSV file (recommended for most cases)
- CSV string data - Paste CSV text directly
- Bulk upload CSV files - Upload multiple CSVs to multiple tables
Header Matching
CSV column headers must match your schema field names exactly. If they don't align, you may need to transform the data first or manually map columns.
Method 3: API Data Ingestion
Best for: Fetching data from external APIs, integrating real-time data, calling web services.
This method allows you to call external HTTP endpoints, retrieve data, and transform it before loading into your schema.
Example: Ingesting Weather Data (GET Request)
Step 1: Add Ingestion Task
- In the MDK, open or create a workflow
- In Components, search for ingestion
- Go to Data Management then drag Ingest data via HTTP request into your workflow
Step 2: Configure the GET Request
In the task configuration:
- URL:
https://api.open-meteo.com/v1/forecast?latitude=-37.84&longitude=144.95¤t=temperature_2m - Method:
GET - Payload:
{} - Headers: leave as default
Removing curl Wrappers
If you copy a URL from API docs that includes curl commands:
- Remove the
curlwrapper - Remove surrounding quotes
- Keep query parameters in the URL itself
Step 3: Run Test to Install Model
- Click Update to save the task
- Click Test to run the workflow
The response will return weather data as text (JSON string)
Step 4: Transform Response to JSON Object
The ingestion response is a string. To work with it as structured data, convert it to a JSON object.
- In Components, search for object
- Under Data Management then Constants add Object Constant component
- Create an operator between the ingestion task and the object constant
Configure the Operator
- Workflow: Data Ingestion
- Workflow task name: Extract json
- Preceding workflow task: Data Management - Ingestion
- Operator input key:
response - Operator input type:
DataIngestionResponse - Following workflow task: Data Management - Constants
- Operator output type:
MdkDataConstantObjectModelInput - Name: Extract json
- Description: Extract JSON from ingestion response
Operator Code
Replace the operator body with:
python
import json

value = json.loads(response.response)
return value
Understanding the Transform
response.response- The string field from the ingestion task outputjson.loads(...)- Converts JSON string to a Python dictionaryreturn value- Passes the dictionary to the next task
Step 5: Verify Transform Output
Run the workflow again. You should now see:
- Task 1 output: Raw response as string
- Task 2 output: Parsed JSON object
- Task 3 output: Object constant containing the parsed JSON
Troubleshooting: Permission Error
If the operator fails with a permission error involving PyRunner or Airflow:
- Go to Nexus
- Open PyRunner
- Click Restart or Redeploy
- Re-run the workflow
Example: Creating Data via POST Request
You can also use ingestion to send data to external APIs.
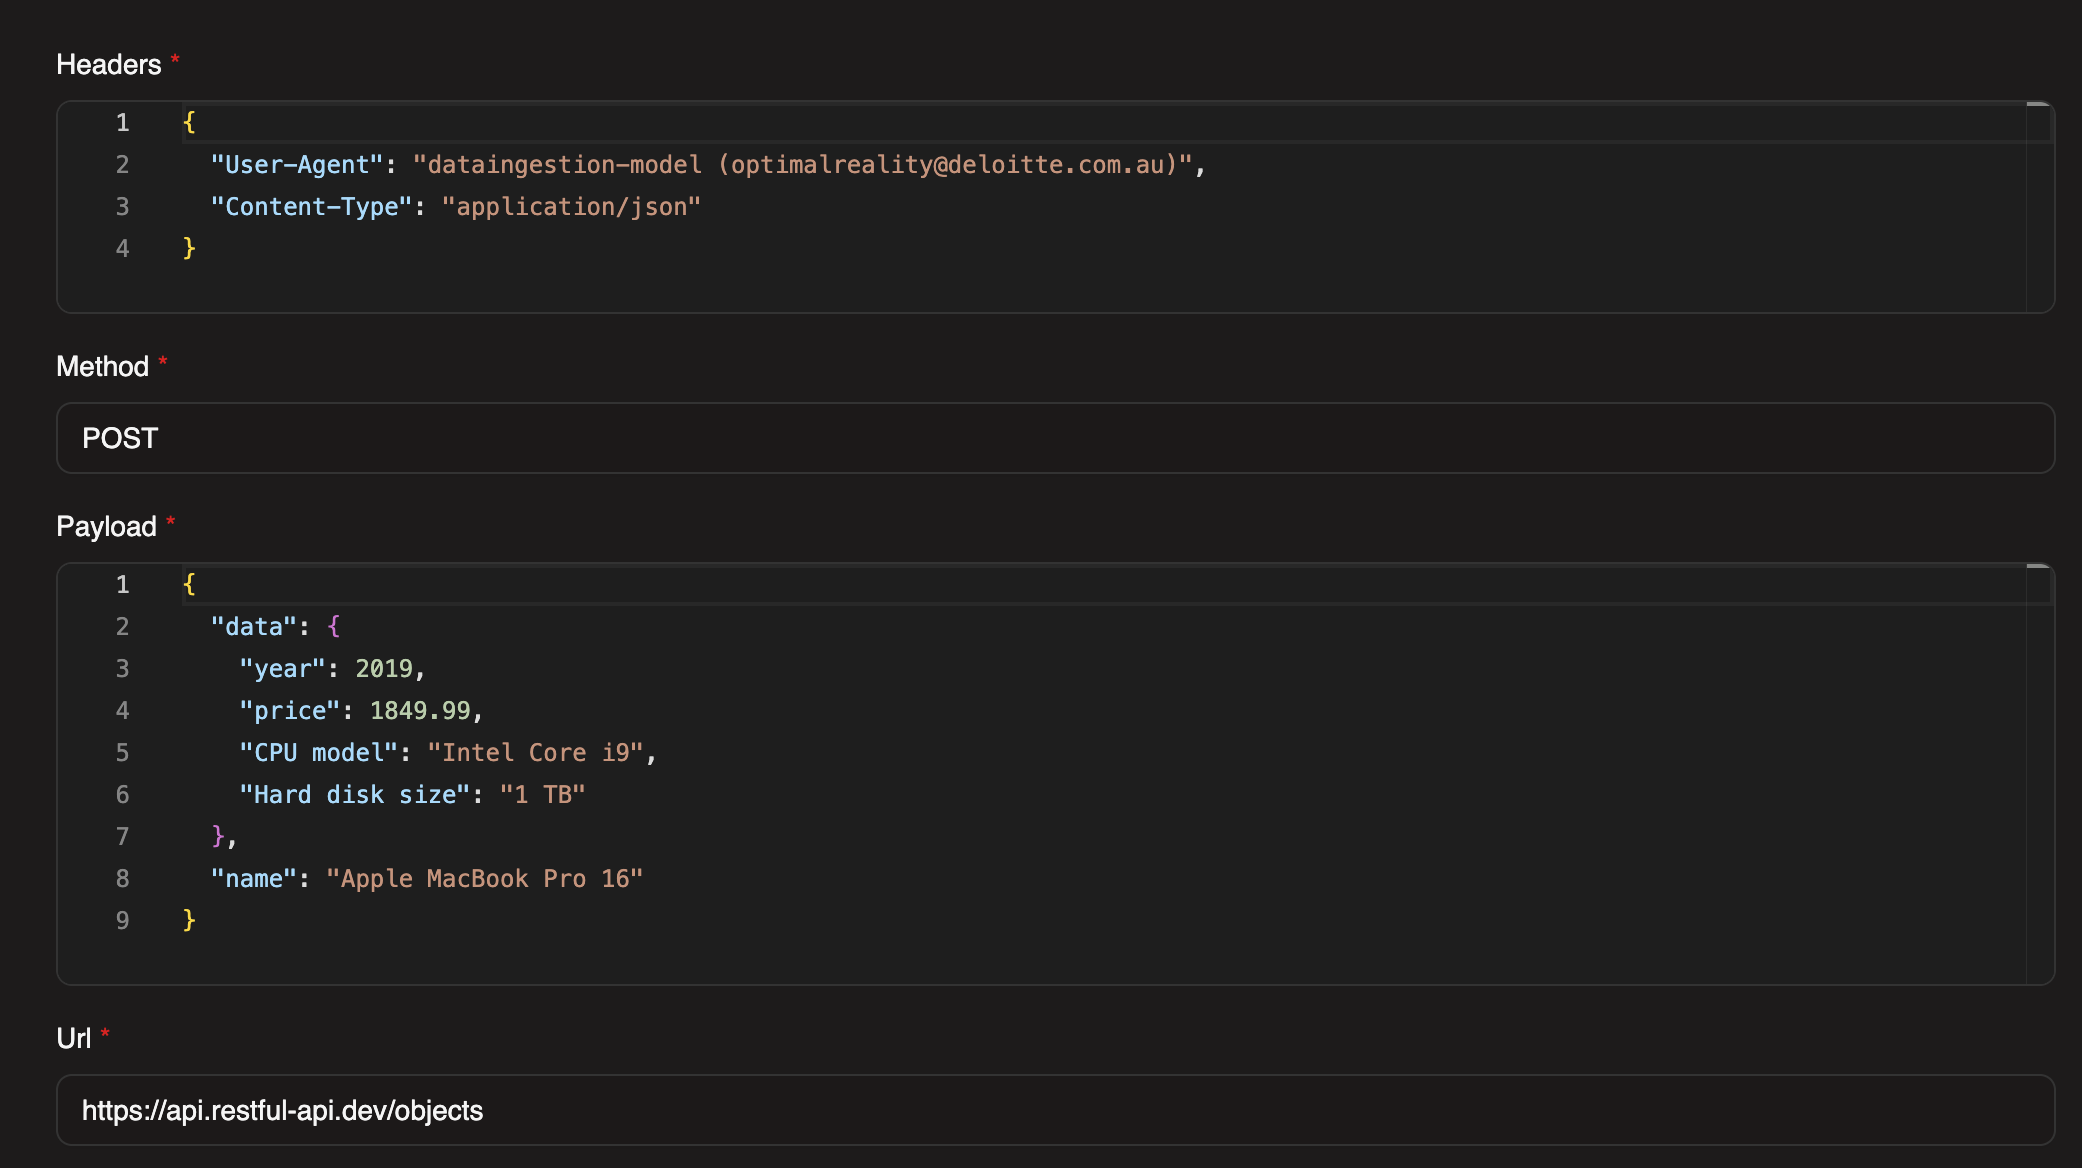
Step 1: Configure POST Request
Reuse the ingestion task and update the config:
- URL:
https://api.restful-api.dev/objects - Method:
POST
Headers
json
{

  "User-Agent": "dataingestion-model (optimalreality@deloitte.com.au)",
  "Content-Type": "application/json"
}
Payload
json
{
  "data": {
    "year": 2019,
    "price": 1849.99,
    "CPU model": "Intel Core i9",
    "Hard disk size": "1 TB"
  },
  "name": "Apple MacBook Pro 16"
}
Step 2: Run the Workflow
The API will return the created object as JSON text. The same JSON extraction operator from the GET example will work here.
Loading Ingested Data into Your Schema
After ingesting and transforming external data, you can load it into your schema using Method 1 (manual workflow load):
- Ingestion task fetches the data
- Operator transforms it to match your schema
- Data connection saves it via GraphQL mutation
Common Issues and Solutions
| Issue | Cause | Solution |
|---|---|---|
| "Table/object does not exist" | Migrations haven't been applied | 1. Go to DDK → Migrate 2. Click Create migration 3. Click Apply latest migration 4. Re-run your workflow |
| "Missing required fields" | Your data doesn't include all required fields | - Check your schema: which fields are marked required? - Add the missing fields to your JSON/CSV/object constant - OR remove the "required" constraint if it's not necessary |
| "Wrong value types" | Data type mismatch (e.g., string in a number field) | - Numbers: Remove quotes → 50 not "50"- Strings: Add quotes → "John" not John- Booleans: Use lowercase → true not "true" |
| "File not found" (Bulk Load) | Incorrect file path | - Check that your file is in: MDK Experiment Manager Data/data/yourfile.json- Use the runtime path: /airflow/data/yourfile.json- Verify the file name matches exactly (case-sensitive) |
| Foreign Key Constraint Violation | Your data references an ID that doesn't exist in a related object | - Import parent objects first (objects with no foreign keys) - Then import child objects (objects that reference parents) - Verify the referenced IDs exist using GraphQL queries |
| Operator Fails with PyRunner Permission Error | PyRunner service needs restart | 1. Go to Nexus 2. Open PyRunner 3. Click Restart or Redeploy 4. Re-run your workflow |
| "Type mismatch on field X" (DDK Data Attachment) | CSV values don't match the expected data type | - Strings in number fields: Remove quotes from numbers in CSV - Commas in numbers: Change 1,234 to 1234- Wrong date format: Use Unix timestamps for timestamp fields - Boolean format: Use lowercase true or false |
| "Missing required field" (DDK Data Attachment) | CSV is missing a column for a required field | - Add the missing column to your CSV - OR remove the "required" constraint from the schema field (if appropriate) - OR set a default value for that field in the schema |
Best Practices
Do
- Apply migrations first before attempting any data load
- Start with small datasets (5-10 records) to test your workflow
- Import in dependency order (parent objects before children)
- Clean your data before loading (remove duplicates, fix types)
- Use consistent ID formats across related objects
- Validate in GraphQL after each load to confirm success
Don't
- Don't skip migrations - your tables won't exist
- Don't mix data types in a single field
- Don't use special characters in IDs (stick to alphanumeric + underscores)
- Don't load massive files without testing smaller batches first
- Don't forget to check logs when workflows fail
Next Steps
Now that you can load data into your schema:
- Query your data using GraphQL → GraphiQL View in DDK
- Build workflows that process this data → Building and Configuring Workflows
- Build AI workflows with your data → Building AI Workflows
- Visualize your data in dashboards → Configure Application in FDK